Hi my lovelies! I have a little tee refashion for you today. Been a while, huh? Nothing elaborate or super hard, pretty straight forward and could probably be done no-sew with some liquid-seam. I think it would be particularly cute for a little girl, but also for a mommy, such as moi. Cause I don't have a little girl, so yeah.
Anyway, wanna see?
(First I gotta warn you. I live in Canada. In Canada Winter is about to hit at any moment, really. What does that mean for you? Horrible picture weather is what. So pls, forgive the picture quality for this post and tute and all the following to come until about April. Thanks a bunches!)
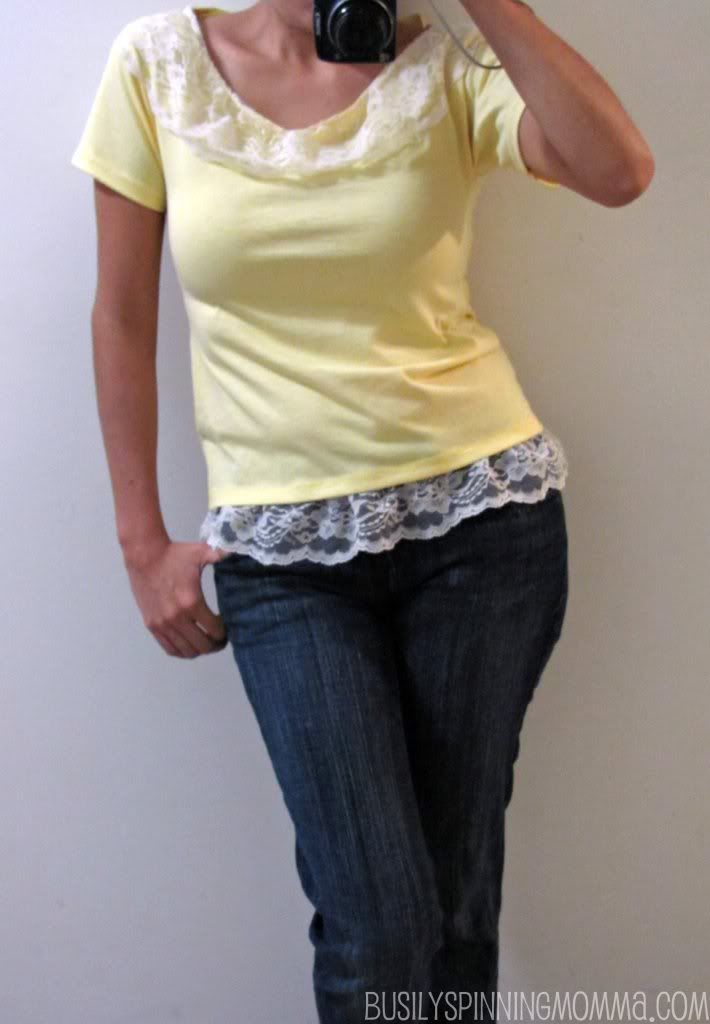
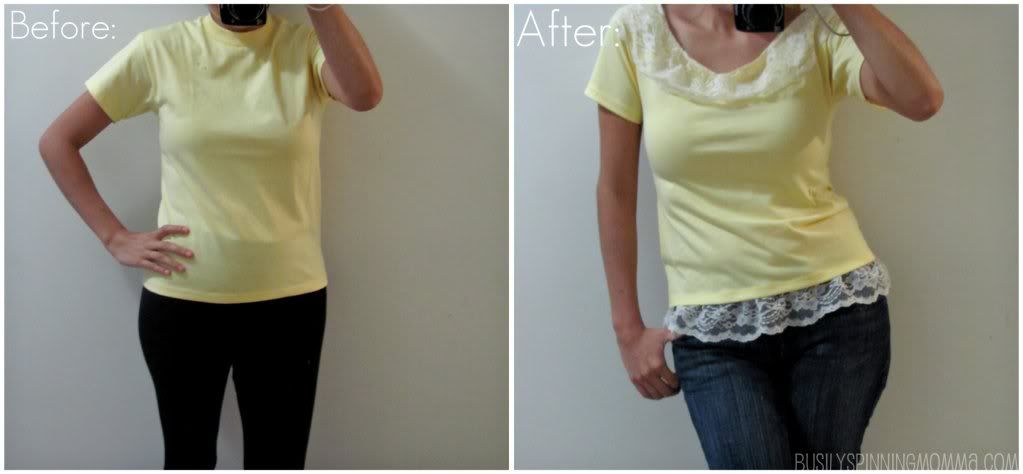
Today we're going use a too small boys tee to make this:
From this:
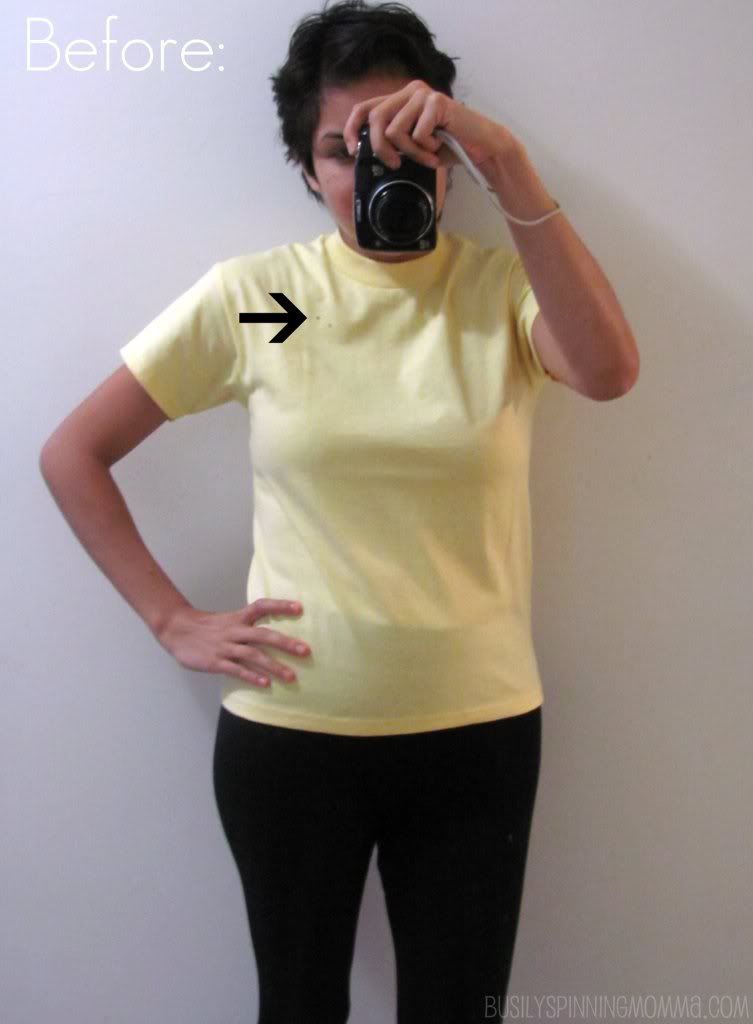
Seriously guys, how much do you love that before pic? Don't I look HOT? I can barely decide what's cuter, my rat's nest hair or my crazy tight spanx! LOL! And ewwwww, I HATE this pic....but, hey, that's why it's called a BEFORE picture, right? :)
Okay so get ready and grab what you need!
YOU WILL NEED:
- A boy's/men's tee that fits just a bit too snug (try a large in boys or a small in men's)
- Some lace, I would say about a yard
- Scissors
- Pins
- Liguid-Seam if you don't wanna sew
- Sewing machine
HERE WE GO!
Take the top and try it on and see about where you want your new neckline to hit. I wanted to get rid of the stain. See the arrow.
I forgot to take pics of the next two steps, but I'll do my best to explain.
1. I then put the tee back on INSIDE OUT. I used the same method used HERE to take the side in a tiny bit. I wanted a more feminine shape. Click on the link for a full picture tutorial.
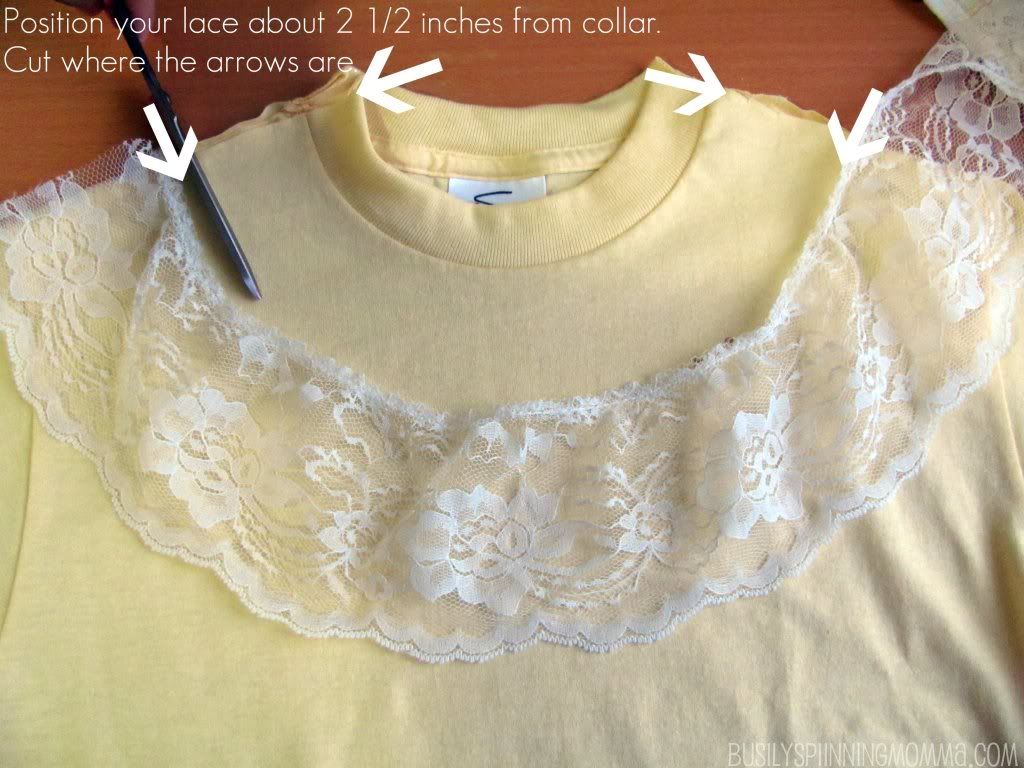
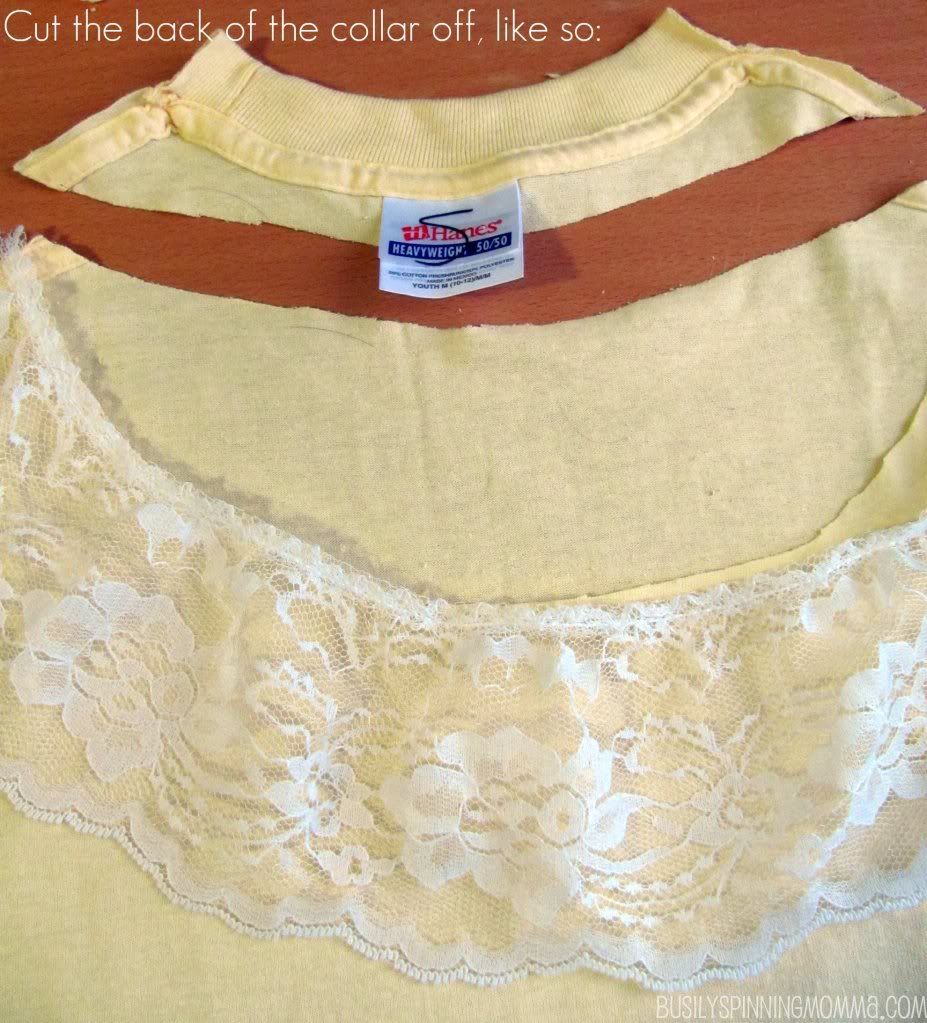
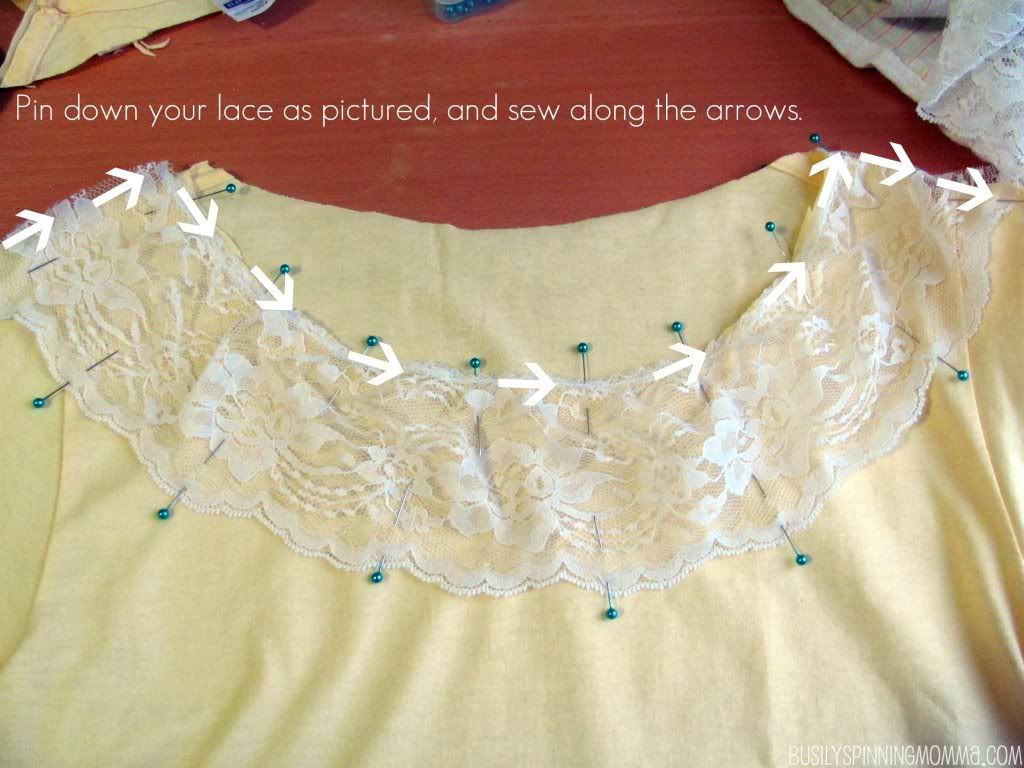
2. Next I add lace to the bottom of the tee. I kept the tee turn inside out and took my lace and pinned in to the very bottom hem of the tee. I did this ALL the way around. I then sewed it along the factory made hem lines. After sewing turn, right side out again.
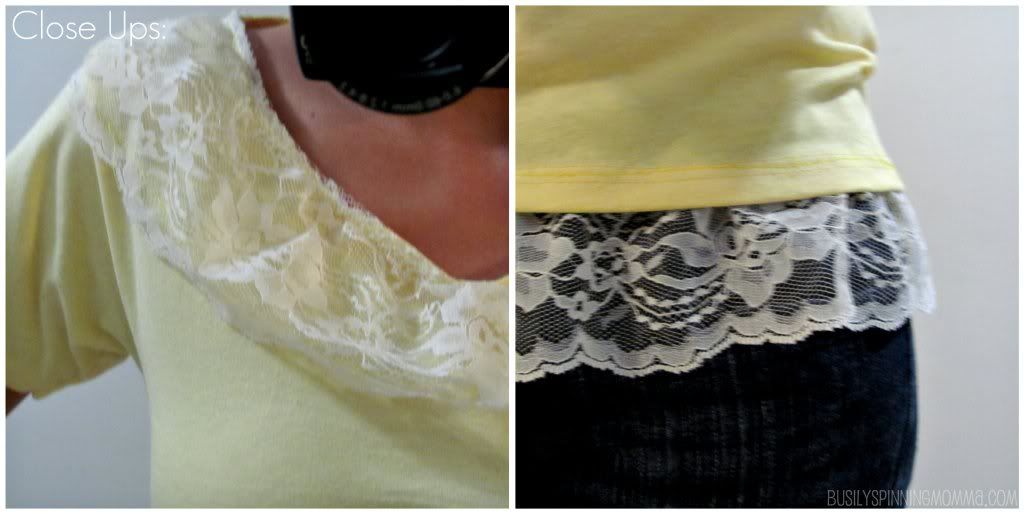
This is what you'll get:
And that's it! SO easy, you could probably have your daughter help you!
Here are some more views:
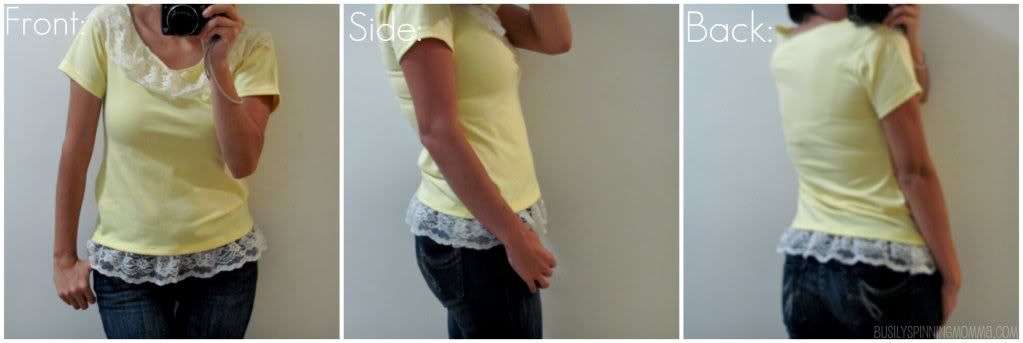
Oh the grainy-ness!
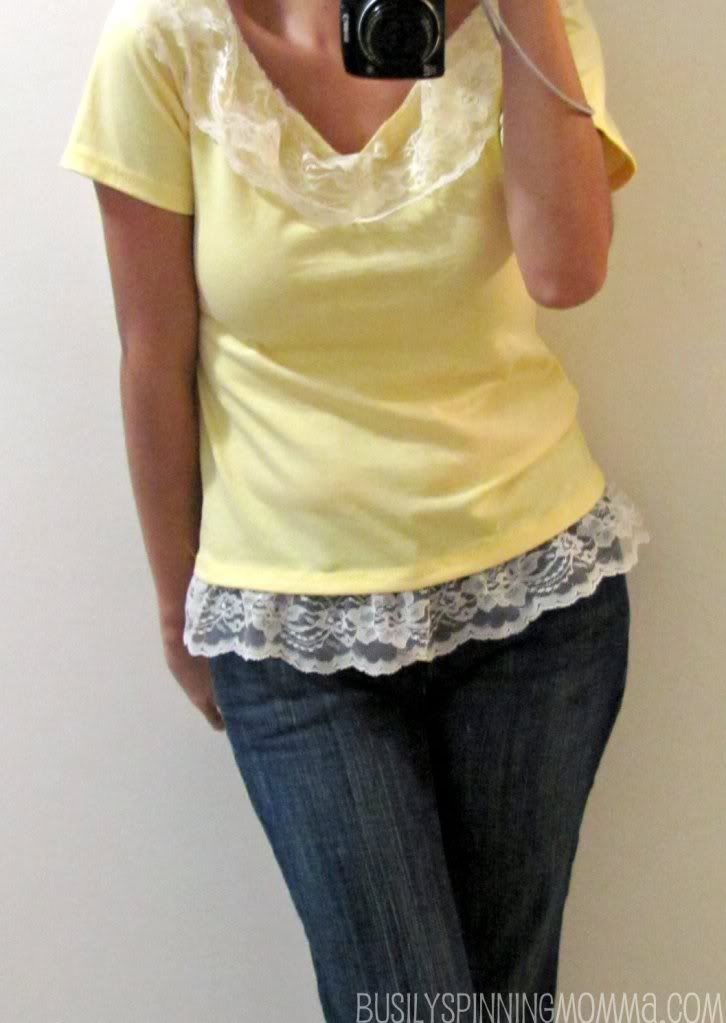
It was SO simple to do, took less than 30 minutes and now I have a super cute top that is casual enough to wear with jeans, but special enough to look nicer than a plain ol' tee.
I kinna love it :) And, is it just me, but would this not be a cute Christmas gift? Easy, thrifty AND homemade! (well, sorta...meh...good enough!)
And just for fun, a before and after:
Now there's no reason to get turned off by those too small tees with those horrible choker like collar! Just grab your scissors and you're set!
And yes, you guys, I know it's really simple, and I almost felt bad posting this tute! I did! I felt like I'm insulting you guys! But I hope you enjoyed it and that at least one person found it a midge helpful :)
Thanks again for reading and as always, if you have any questions, please feel free to ask them in the comments! (If you post under Anonymous, pls leave an email so I can actually respond!)
This tute (and many more!) will be available under the Tutorial Tab at the top :)
xoxo, Dorian
P.S: Don't forget to enter the wall giveaway of a stencil OF YOUR CHOICE, valued at $50 HERE! Entries are low, chances to win are good :)

I love this idea! So do you just leave the upper edge kind of raw? I'm used to finishing everything off. Looks so pretty
ReplyDeleteLove it! I must have some lace in one of my boxes...!!
ReplyDeleteAlison
x
That's a great upcycle!!! Love the new tee.
ReplyDeleteI love it! Thanks!
ReplyDeleteSuper fun! I've thought of doing that to a few of my tops. Now I'll try it, thanks for the motivation ;)
ReplyDeleteCheck out my skirt refashion on my blog if you get a chance. Love making old or non-wearable things new favorites!
www.shelstring.com
I seriously just bought some lace and have been wondering what to do with it...I'll have to start hunting for a t-shirt. I just love the tutorial and I love this new lace trend that's popping up! Great work as usual, Dorian!
ReplyDeletelove the lace! super cute top! :)
ReplyDeleteWhat a cute top, I love upcycling and have been doing it a lot lately with some of my favorite pieces from my MIL. You did a good job.
ReplyDeleteThat is really cute! What a great idea!
ReplyDeleteLove your haircut!! I used to have mine like that... and now I miss it!! :)) Thanks for linking! :))
ReplyDeletei love this tutorial! i'm definitely gonna have to do that too! :) but everytime I wear boys shirts (because i used to thrift a ton of them) they made me look so flat chested! i will look for one to try out again though! :)
ReplyDeletesharde @ the style projects
Nice tutorial :)
ReplyDeleteStopping by via FFF...i'm a new follower!
Stop by and visit me sometime if you want :)
Hello! I found your blog through the Follower Fest going on at Casey's. I'm now a follower of your blog too. Love this idea. I have so many shirts I need to fix now. lol :)
ReplyDeleteDigger ~xoxo~
www.digdeeperdesign.blogspot.com
Oh this is so cute! I never would have thought of this! Very impressed! Glad I stumbled on you through the blog hop!
ReplyDeleteVery cute! I am a new follower from followers fest...still trying to catch up!
ReplyDeleteFeaturing YOU over on my blog today! Thank you so much for linking up to my {wow me} wednesday party last week. :) Feel free to stop by & grab a featured button!
ReplyDeleteGinger @ gingersnapcrafts.com
http://www.gingersnapcrafts.com/2011/11/take-look-at-you-my-favorites.html
I love that it is easy. Sometimes we need an easy project in the middle of the hard ones!!! :-) Thanks for posting!
ReplyDelete