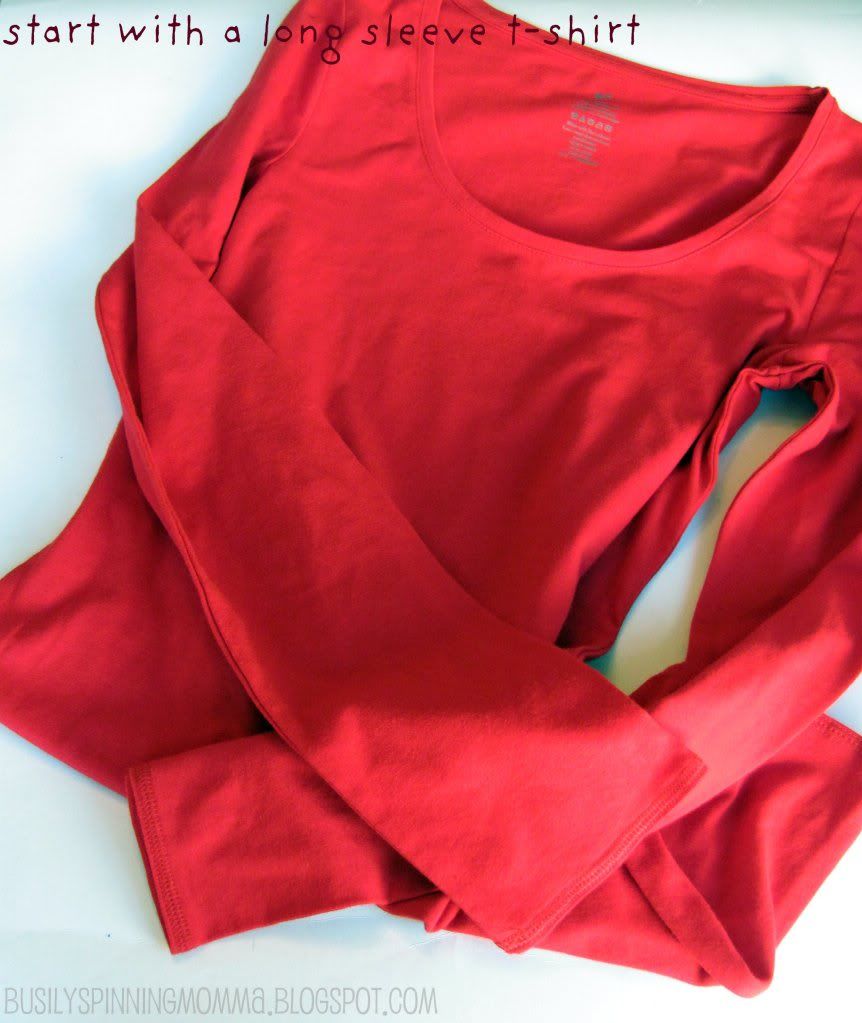
So here is that long promised (and sadly late) Anthro inspired tee tutorial. Grab a t-shirt and come along for the ride!
This is a dress from Anthropologie that I fell in love with last summer. It's called the "Count the Waves" dress, gorgeous, right? The price? $148! NOT happening!

But, I loved the ruffles and buttons, somehow it just looked so perfect and proper and flirty! So I set out to knock it off, than I thought a tee would be much more versatile!
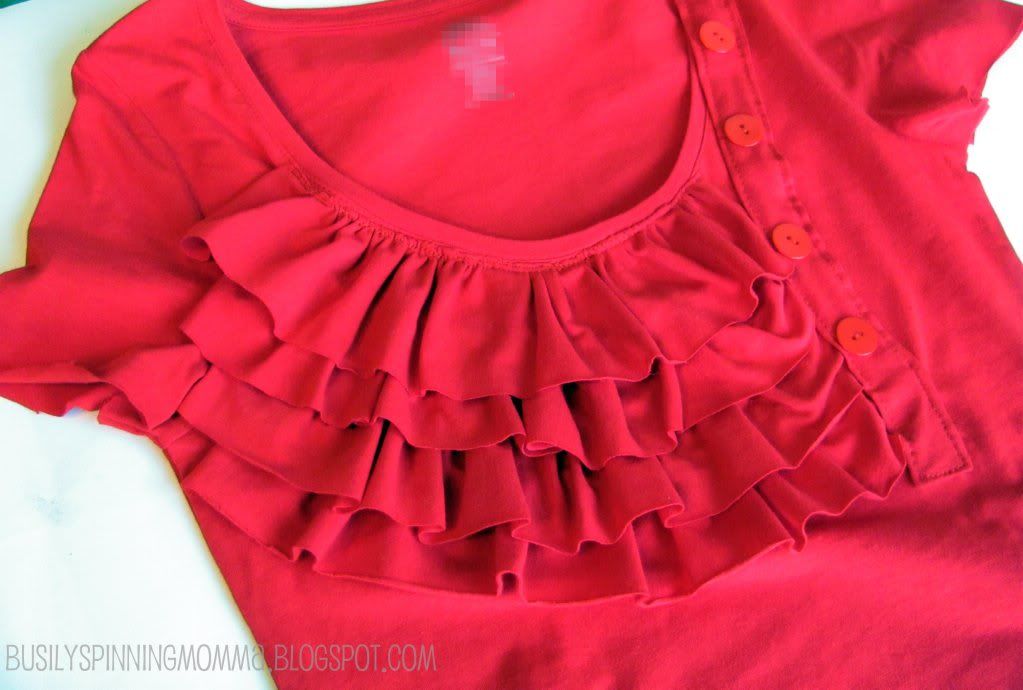
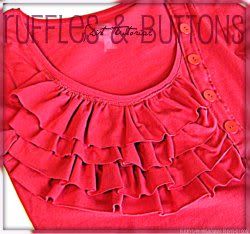
So, I introduce to you my "Ruffles & Buttons" Tee...
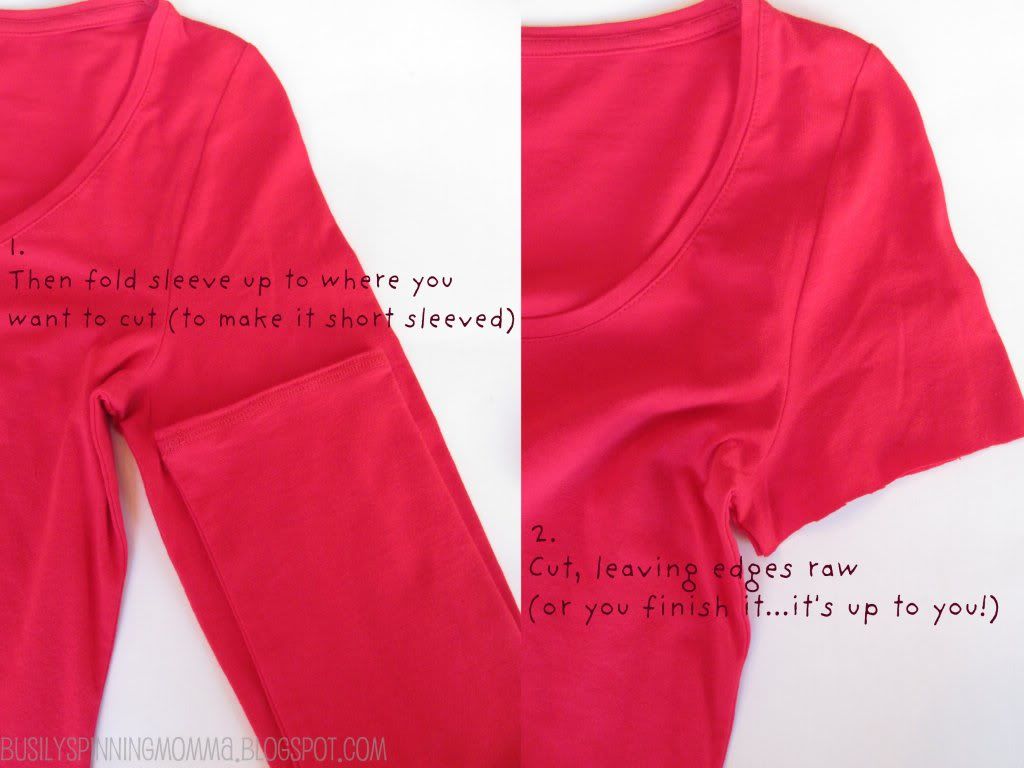
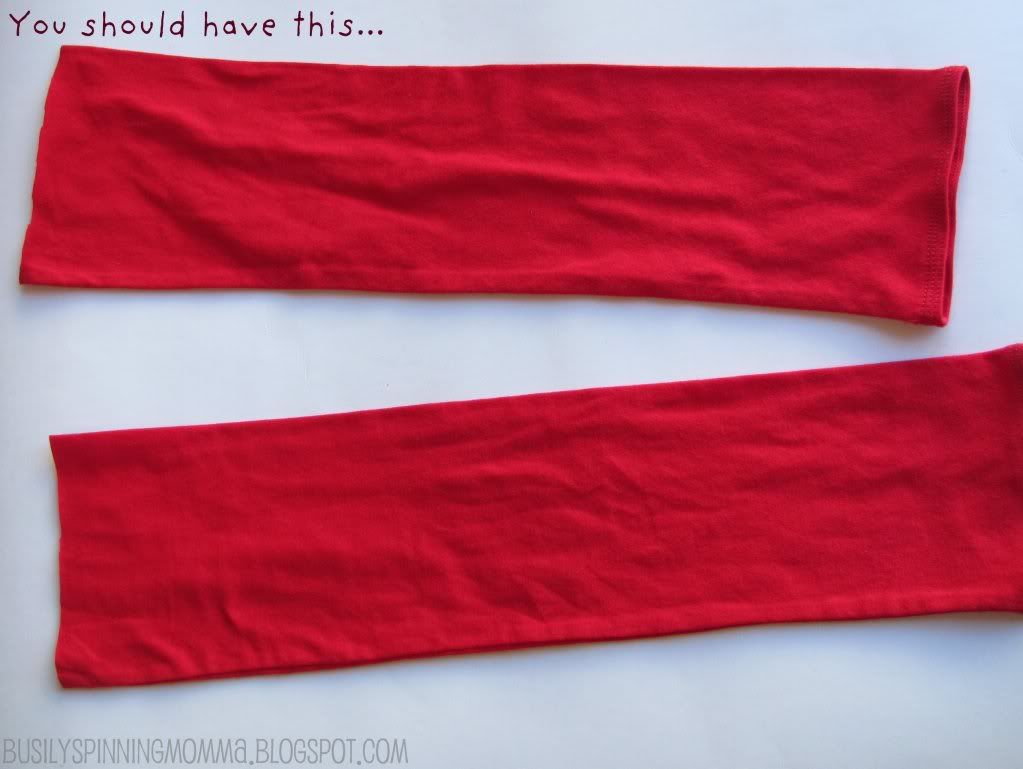
Let's get started...
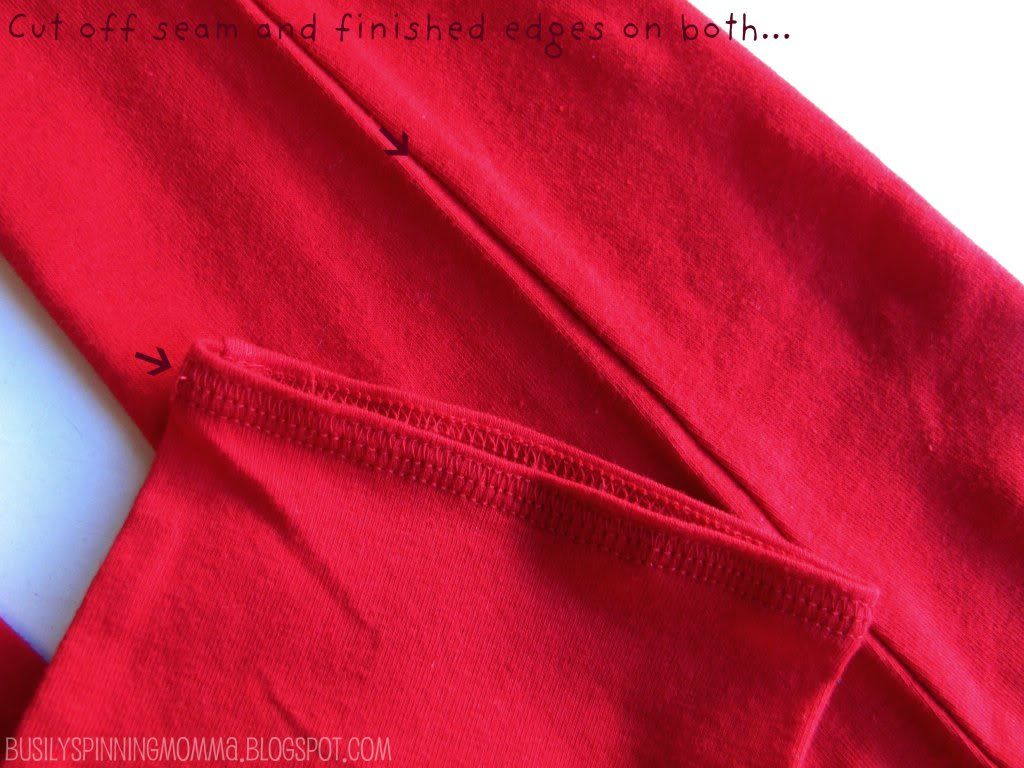


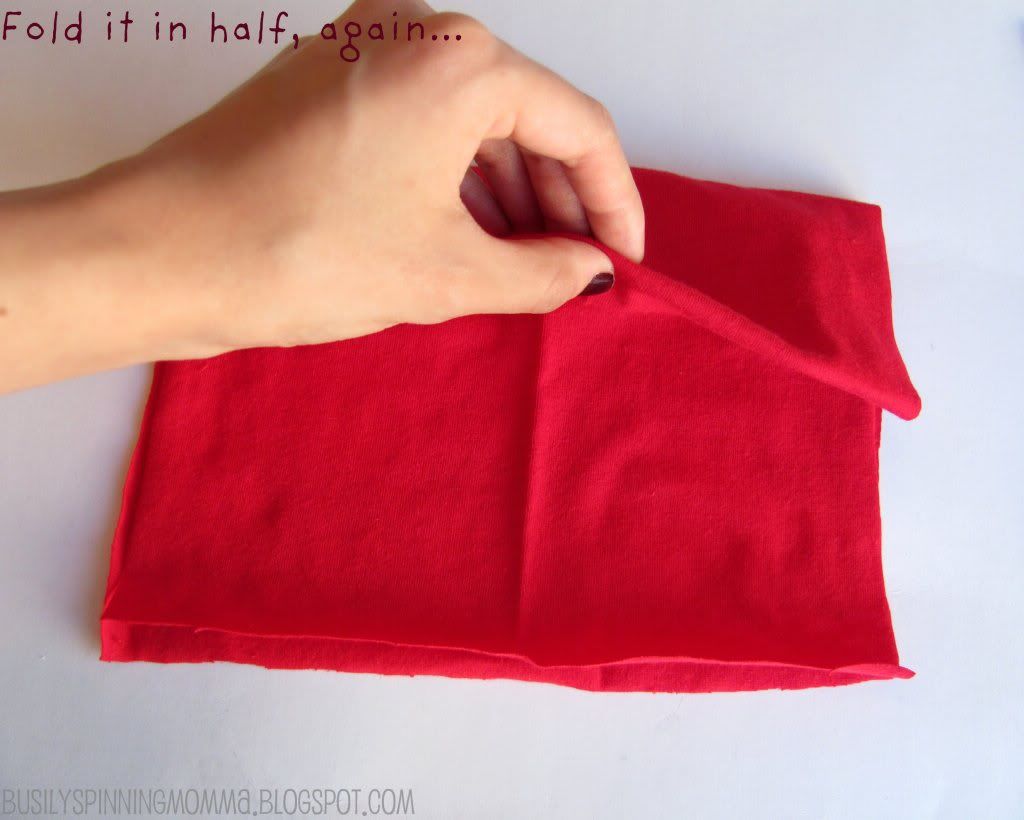

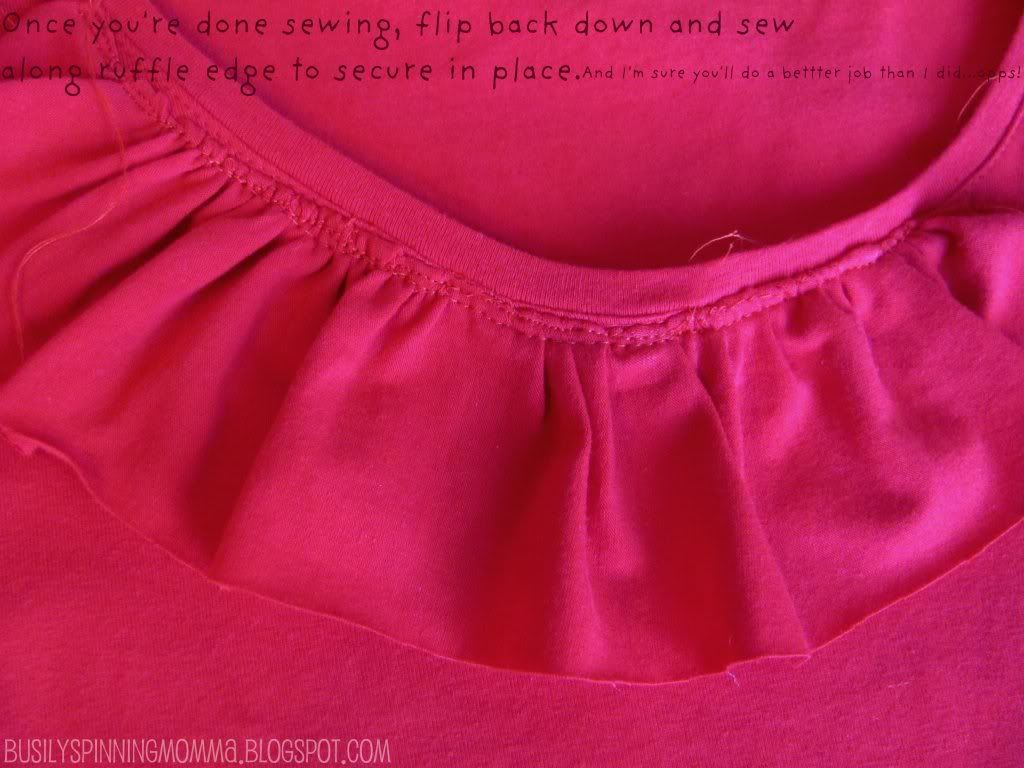
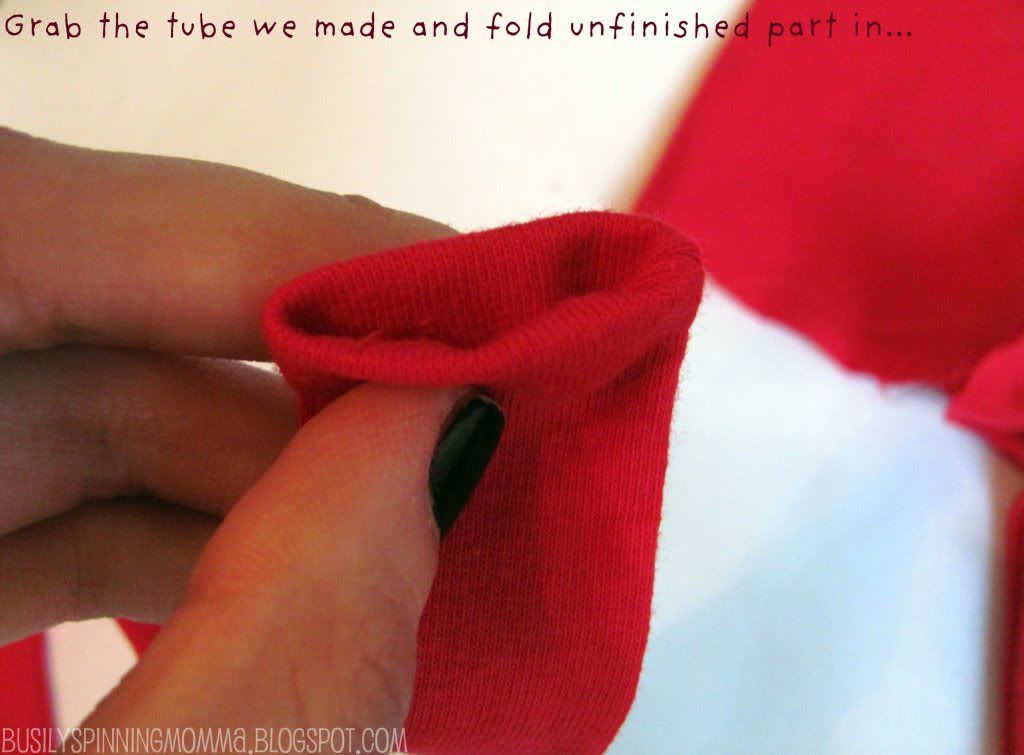
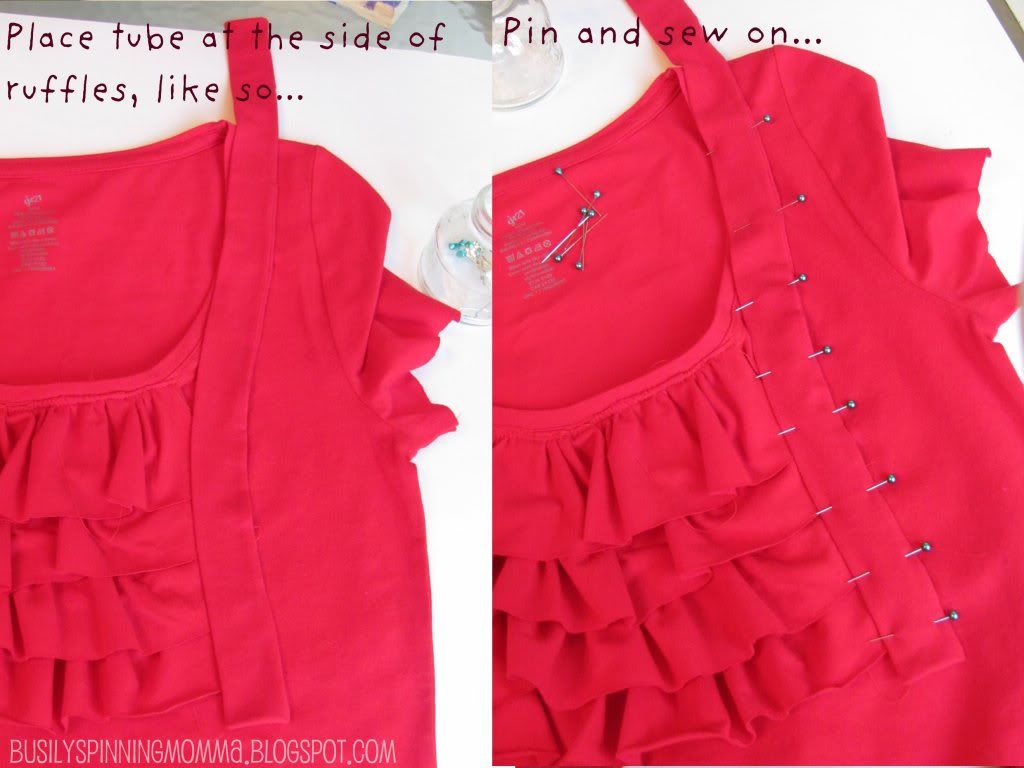
Sew the tube, up the long, and at the bottom. Leave one end open to turn inside out. Iron.
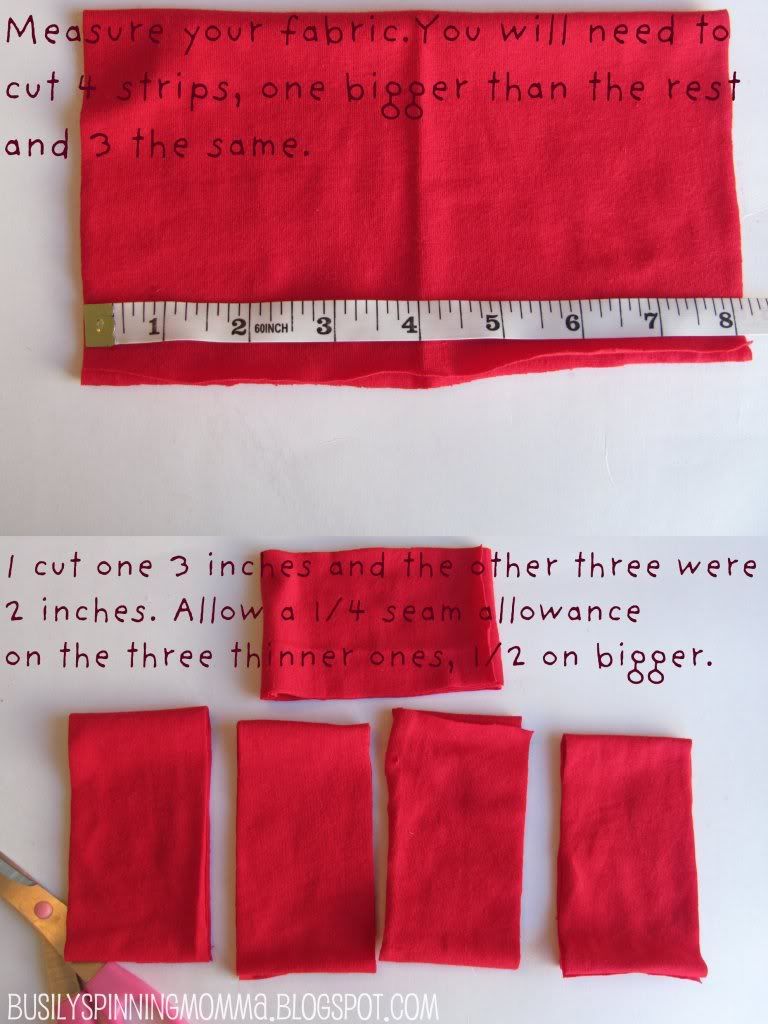
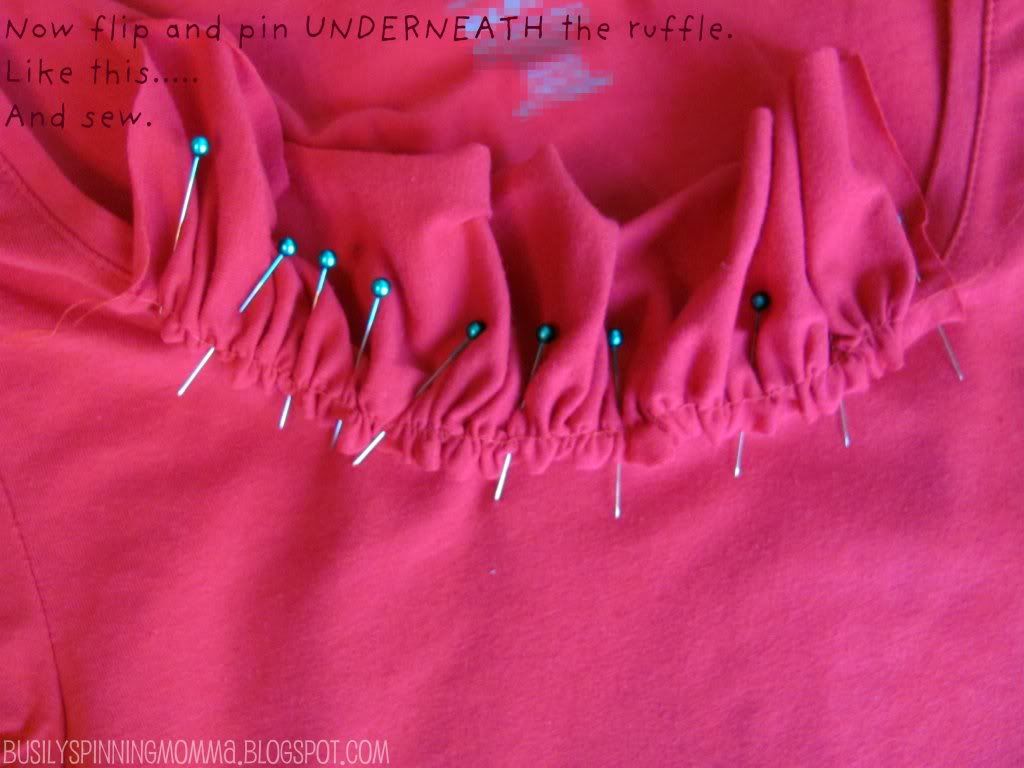
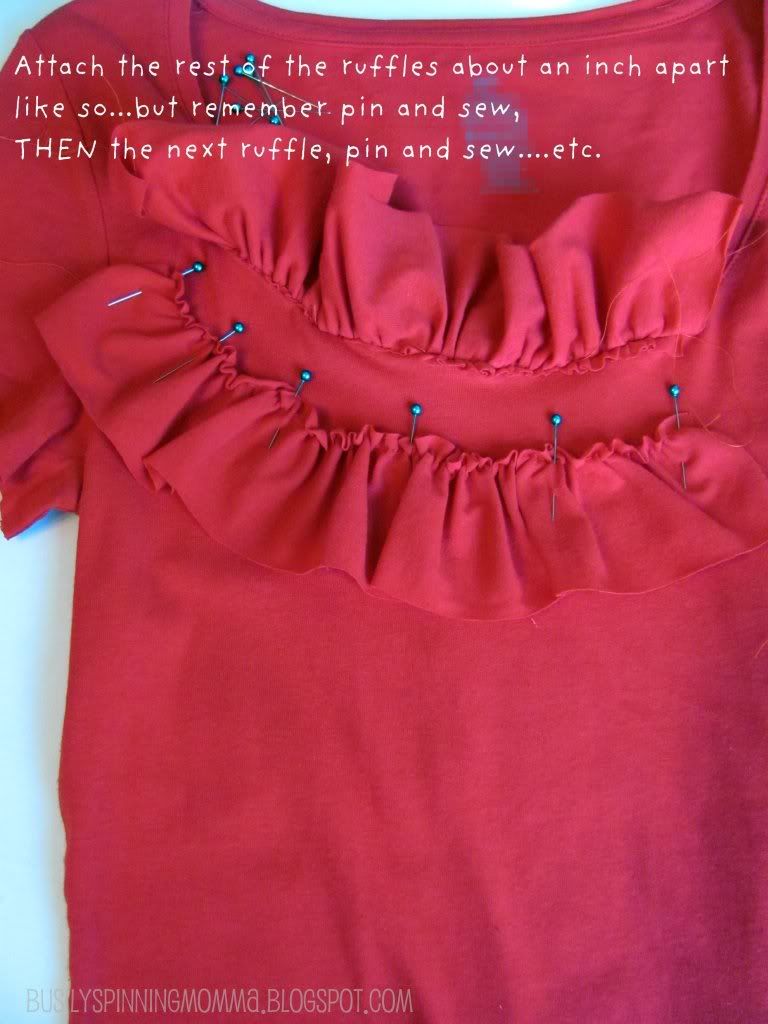
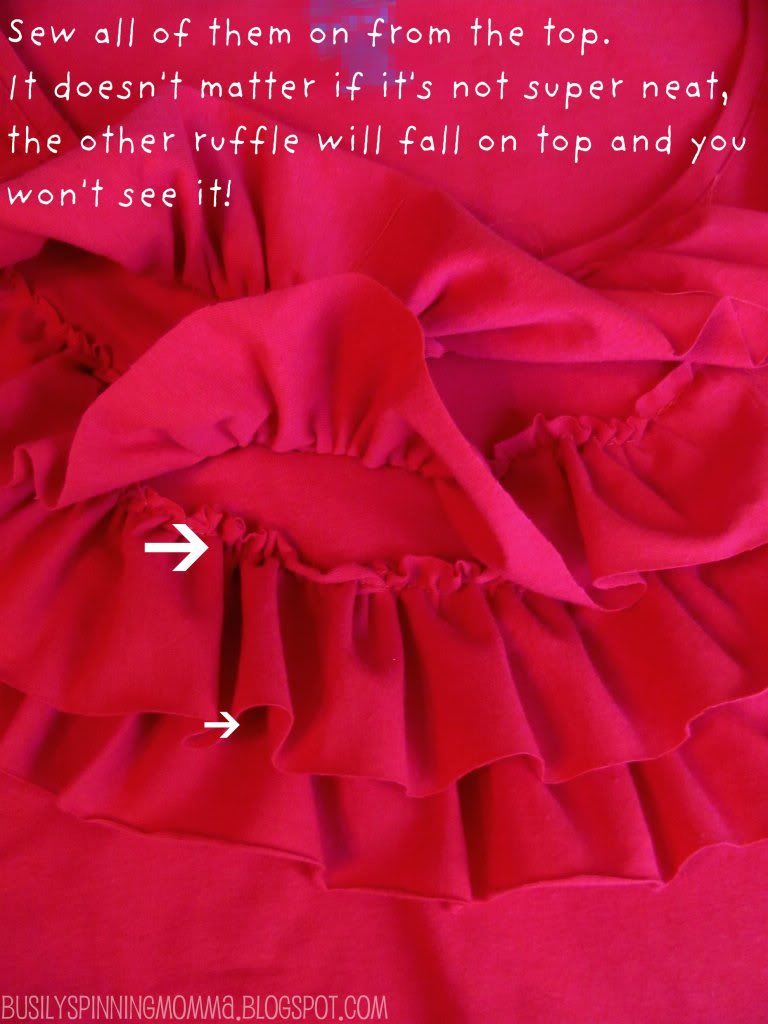
Okay, for this next step there is no picture...now take your other strips and ruffle all three of them. If you do not know how to ruffle, I have a great tutorial HERE. I'm so sorry I don't have one for this tee, I completely forgot to take pictures!
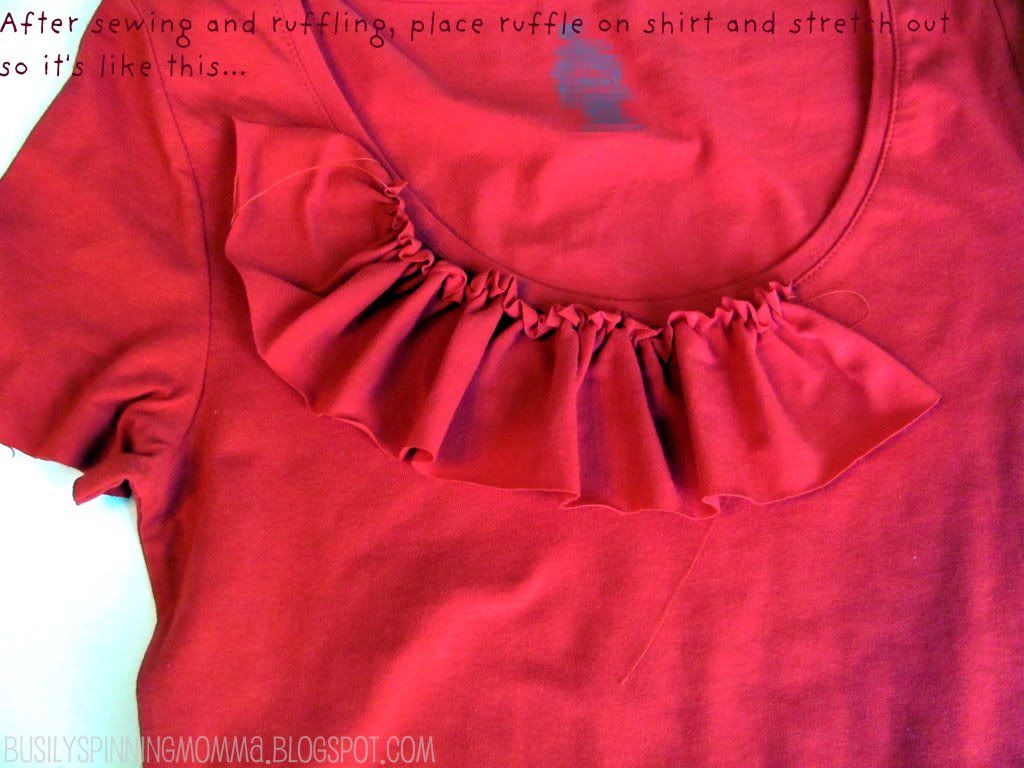
 |
| This is the truest colour of the shirt I could get. |
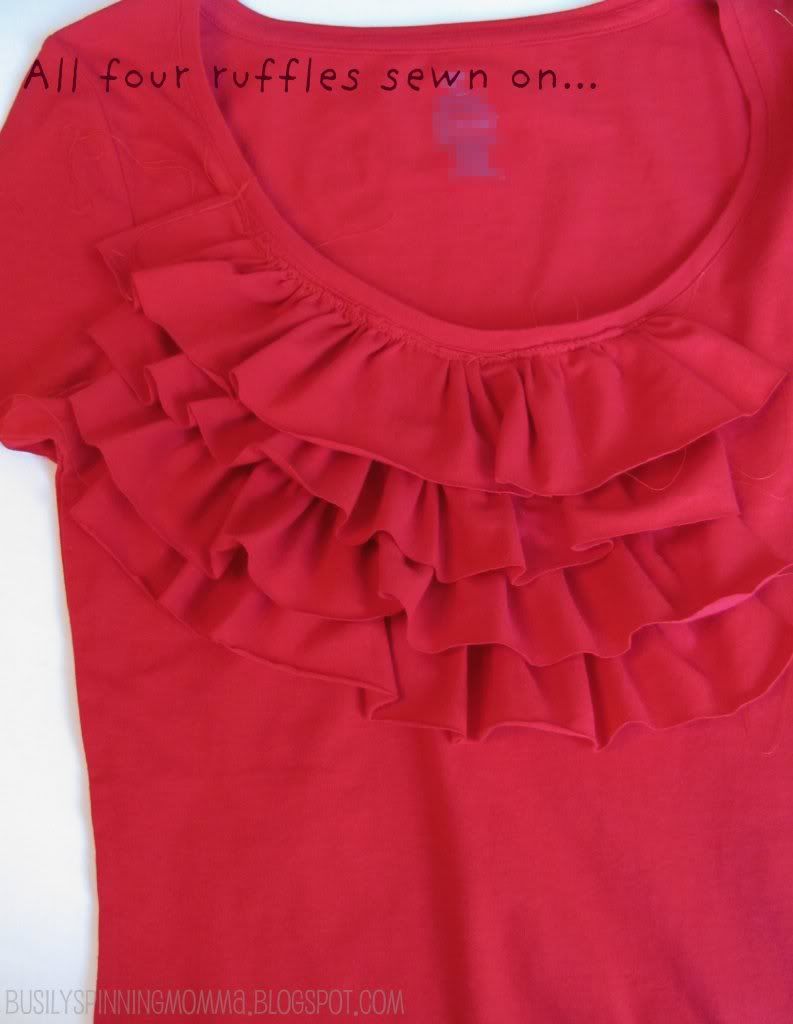
And viola! It's finished! Easy peasy and sweet and fun!
Hope you enjoyed it and forgive how late it is!
And please know, if you have any questions feel free to leave them in the comments and I will address them right away! Seriously no question is too small, I remember when I was learning to sew (HA! still am!) I felt silly asking questions. But please know, you can, and I'll try my best to answer them!
This tutorial can be found in the "Tutorials" Tab, under:
LINKED TO:
***This is to answer RACHEL's (you are a no-reply blogger, couldn't email ya. Boo.)question she left in the comments.***
Yes, finish of tube onto the seam of the shoulder, so that it lines up pretty well. Hope that answers it for you :)

Yes, finish of tube onto the seam of the shoulder, so that it lines up pretty well. Hope that answers it for you :)
xoxo, Dorian
Participating here:
it's so pretty..one day I will make my own! OR.....
ReplyDelete;)
What an amazing tutorial! Wow, you are super talented! I am your newest follower:) THanks for linking up at my party:)
ReplyDeleteCute top and great tutorial!!! I think I may have to try this with a similar blue shirt that is just sitting in my drawer.
ReplyDeleteOh my goodness! You did an awesome job on this...it looks great! :)
ReplyDeleteHoly moley! LOVE IT!!! Wanna make me one? Haha! Cuz I don't really sew. When I sew, I say things to the sewing machine that people shouldn't say to objects . . . :)
ReplyDeletePS - I'm a new follower!
ReplyDeleteWow! This is amazing! I love it! Oh how I wish I sewed! Mine wouldn't look so amazing but I am in such awe of how great yours looks!
ReplyDeleteI'd love you to link this up at my Friday Link Party if you are interested!
Ashley
www.simplydesigning.blogspot.com
I really love it. I bookmarked it to try. www.mylifeunzipeed.blogspot.com
ReplyDeleteVERY PRETTY!!!!I'd love it if you joined my link party! http://runwithglitter.blogspot.com/p/linky-parties.html
ReplyDeleteGreat job! I'd love for you to link up at Wow Me Wednesday!
ReplyDeletehttp://polkadotsonparade.blogspot.com/2011/03/wow-me-wednesday_23.html
I featured you today on my Toast of Tuesday! Come grab a button!
ReplyDeletehttp://polkadotsonparade.blogspot.com/2011/03/toast-of-tuesday_29.html
I thought your top turned out so cute! You did a great tutorial too! Thanks for linking it up to Think Pink Sundays-I featured you today! http://www.flamingotoes.com/2011/04/crush-of-the-week-35/
ReplyDeleteits super nice tutorial..thanks for sharing :)
ReplyDeleteLove the T - great job!!! Very well done!
ReplyDeleteVery cute! And your tutorial is great!
ReplyDeleteWow! This is so cute! Amazing what you can do with a t-shirt! I'll have to give this a try! Thanks for the inspiration!
ReplyDeleteLOVE IT! I'm a new follower btw! :)
ReplyDeleteI love this! Thanks for the tutorial. Pinning it right away :)
ReplyDeletecoming over from Ucreate. I love how the shirt turned out!! I am going to pin it so that I can make it soon. Thanks for sharing!!
ReplyDeleteYour shirt is darling! I think you are a GENIUS for starting with a long sleeve shirt instead of buying 2 shirts. So clever and so easy and so super cute. Thanks!
ReplyDeleteThis comment has been removed by the author.
ReplyDeleteI will try this again! The T is so cute, I love it!
ReplyDeleteI am a new follower.
Very cute shirt! Thanks for the tutorial.
ReplyDeleteThat is such an awesome top! I linked to your tutorial on Craft Gossip Sewing:
ReplyDeletehttp://sewing.craftgossip.com/tutorial-anthro-inspired-t-shirt-refashion/2011/07/24/
--Anne
I will definitely be making this! Thanks for such a great tutorial. I'm your newest follower btw.
ReplyDeleteThank You so much for this fabulous tutorial! I saw your tutorial and by the end of the day I had my own Ruffles & Buttons Tee! I show it on my blog where I featured you as well. Please check it out and grab a feature button as well! Thanks again!
ReplyDeletehttp://thecraftyblogstalker.blogspot.com/2011/07/ruffles-buttons-t-shirt-refashion.html
Amazing! This is adorable! Quick question, where did you finish off the "tube" (the piece where the buttons go). Did you sew it onto the shoulder seam?
ReplyDeleteYou are very clever! I would like to try this project but have a few questions. You said to make one strip 3 in. and the other 3 2in. Where does the bigger strip go, on top? Were you're ruffles 8 in. long, as the photo seems to indicate? Thanks.
ReplyDeleteflgirl1987 AT yahoo DOT com
LOVE it! I just bought a cute yellow shirt for a couple of bucks then thrift store shopped for some other coordinating yellow shirts to take apart for embellishment. I've been trying to figure out a cute way to embellish it. You've just given me that idea. I'm so excited. Thank you!
ReplyDeleteCan you say "Pin it!"... This was on my pintrest in about 2 seconds! I am headed to the store today to get a t-shirt and try it out! Thanks for the tutorial!!! So cute!
ReplyDeleteP.S. I am your newest follower!
xoxo, Ashley J @ mommybydaycrafterbynight.blogspot.com
This is amazing! I'm seeing everyone make this shirt with your tutorial! I am featuring this at somedaycrafts.blogspot.com. Grab my "featureD" button.
ReplyDeleteThis is a very cute refashioning - I'm planning on making it for my daughter. I did wonder about why one strip was bigger than the others (is it placed first or last, perhaps?) and how long the strips were.
ReplyDeleteLooking forward to seeing more!
Love this one too. Good work dorian!!!
ReplyDeleteAnd my sewing to-do list just got a little longer! Thanks for posting this :)
ReplyDeleteThis is really pretty. I love it! :)
ReplyDeleteWhat a lovely tutorial! You had me at ruffles & buttons. :)
ReplyDeleteWhat a great tutorial! That shirt turned out amazing!
ReplyDeleteSo cute! I just love the buttons!
ReplyDeleteI spent the afternoon making one and LOVE how it turned out. Thanks for the tutorial!
ReplyDeleteGreat tutorial! i love it, thanks for sharing.
ReplyDeleteHi! Love this top! Where does the fourth (larger) strip go? Is it the bottom ruffle? Thanks!
ReplyDeleteAlso, I have to tell you that the word is voilà. Just to help out with your French :)
Just wanted to let you know that I featured this on my blog today: http://www.snugasabugbaby.com/some-stuff-i-am-loving-cute-as-a-button/.
ReplyDeleteI am excited to use your tutorial for myself one of these days. Thanks so much for sharing!!
i am not super new to sewing but am definitely still learning... do you need to do anything to the cut ends of your ruffles? will they fray in the wash? and is there a certain fabric type to do this with? sorry so many questions but im still learning and i loved this blog. i have made ruffles before but always hemmed the edges (made them for dresses on my girls, etc) and would really like to do this with a shirt of my own soon... you can email me at bulldawgbabyp1985@yahoo.com thank you for your blog, tutorial and time! :)
ReplyDeleteLove this shirt! I do have a few questions though...
ReplyDelete1. One ruffle strip is wider(3"): where does this one go? Is it the first one you sew on at the top?
2. When you sew the top ruffle, is it really necessary to topstitch once you've folded it back down? Is there a reason why it can't just drape? (Reason behind this question: I'm afraid my stitches won't be straight, whereas if I just let it drape, no stitches will show.)
3. Sorry if I'm missing something, but I can't seem to get the math right. If your rectangle is 8" wide, how are you getting a 3" strip and three 2" strips? (That adds up to 9".)
4. Where does the 5th strip come from?? Is there enough leftover on the angle part that's cut off for this?
I so very badly want to make this shirt, but I don't like to try a project unless I'm confident I understand all of the steps.
Thank you!
-- Lis
TheQuiltedFiddle(at)gmail(dot)com
woooow coool thank you so much :)
ReplyDeleteThis is adorable! I saw a similar shirt on a character in a tv show I was watching recently and thought it was adorable. I'm definitely going to attempt to make my own now. Thanks for sharing such a cute idea!
ReplyDeleteBrilliant!!
ReplyDeleteNot late, perfect timing! Buy long sleeve tees right now as they go on sale for (Shhhiivverr) Summer clothes to usher their way in! :,)
ReplyDeleteI made this shirt & got SO MANY compliments on it! Thank you for the inspiration.
ReplyDeleteThis post is helpful with an analysis I am doing for a specific group of people. Do you have any other articles to suggest on this topic? Thanks marathon races in charlotte nc
ReplyDeleteHow did you finish the top of the tube with buttons by the shoulder seam? I have been having trouble trying to figure out exactly how to handle this part. This so beautiful. I will now spend $2.00 and make a $150.00 top!
ReplyDeleteOh my goodness! You did an awesome job on this...it looks great! :)
ReplyDeletebaby boudoir pillow
baby pink accent pillows
sofa accent pillow white
Amazing, thank you so much for sharing such an amazing blog. Visit Ogen Infosystem for creative website and development services.
ReplyDeleteTop 5 Website Designing Company in Delhi